How To Make A Dmg Bootable Usb

To make bootable USB drive we need an application called Rufus. It can create bootable USB for both BIOS and UEFI systems also it can create bootable USB of several operating systems such as Windows, Ubuntu, Linux, etc. Creating bootable USB using Rufus is a natural process because it is a portable application so that we don’t have to install. Before to start the process of creating a bootable USB you need to insert the USB drive to your computer. Then navigate to search bar of macOS High Sierra, then type there DISK UTILITY, after that, click on erase button. Be aware that you are selected the Mac OS Extended (Journaled) from the format list. However, you need at least 8 GB USB Drive or more then it, it can be better. Dec 10, 2018 Creating a bootable DVD from DMG in Windows is easy, but you need special software to do the job. These two methods utilize third-party utilities to make bootable DVD using a DMG file.
About a month ago, we talked about creating a bootable USB of macOS on a Mac with the help of a free app called DiskMaker X. The app is very easy-to-use and is updated to support the newest version of macOS.
- Part 3: Create Bootable USB from DMG in Windows Via PowerISO Step 1.: Download PowerISO and install it in your Windows PC. Step 2.: You can import the DMG file directly by clicking on ‘Burn' in. Step 3.:Now review the settings to select the burn speed. Step 4.: Now click on 'Burn' and wait.
- And you just need to follow its on-screen instructions to create a bootable USB drive by clicking a few buttons. Install Disk Creator: Once you run the application, select a USB drive, choose a Mac OS installer, and click Create Installer to begin to create an install USB drive. Disk Utility to Create a Bootable macOS/OS X Installer.
- To create a bootable USB flash drive. Insert a USB flash drive into a running computer. Open a Command Prompt window as an administrator. Type diskpart. In the new command line window that opens, to determine the USB flash drive number or drive letter, at the command prompt, type list disk, and then click ENTER.
UPDATE: If you’re looking to prepare macOS Sierra or Mojave bootable USB, please refer to our new how to create macOS Sierra bootable USB from Windows guide for step-by-step directions.
Even though it’s always a good idea to prepare macOS bootable USB on a computer running macOS only, at times you might come across situations where you have no options but prepare the bootable media of macOS on a Windows PC. Take, for instance, your Mac machine is unbootable and you’re unable to fix the issue or re-install the OS using the Recovery Assistant. Or maybe, the Recovery Assistant isn’t appearing when you hold down the Option key.
Mac users who don’t have access to a bootable Mac machine to prepare the bootable USB of macOS can take the help of a computer running Windows operating system for the job. The only thing is that you must have the DMG file of macOS.
If you have the DMG file of macOS and a USB flash drive of size greater than 16 GB, it’s easy to prepare the Mac OS X bootable USB on a Windows PC. Simply follow the given below instructions to prepare your bootable USB of macOS on a PC.
Create macOS Bootable USB on Windows 10
NOTE: The guide was originally written to prepare Yosemite bootable USB but the guide is compatible with the latest macOS Mojave as well.
Step 1: The first step is to download TransMac software and install the same on a PC running Windows operating system. Even though TransMac is a paid software, the 15-day trial copy is good enough to prepare the bootable USB of Mac on your PC.
Step 2: Stick in the USB drive that you want to boot and install macOS from and backup all data from it, if any. The drive will be erased completely during the process of making a bootable USB.
Step 3: Launch TransMac software with admin rights by right-clicking on TransMac icon on the desktop and then clicking Run as administrator. Upon launching the TransMac software, the Trial reminder dialog will appear. Simply click Run button to continue using the software.
Step 4: Once TransMac is launched, in the left pane, right-click on the USB drive that you would like to make as bootable, right-click on the same, and then click Restore with Disk Image option.
Click the Yes button when you see the warning message on your screen that the drive will be erased.

How To Create A Bootable Osx Usb High Sierra
Step 5: Next, Restore Disk Image to Drive dialog will appear on the screen. Here, click the “…” button under Disk Image to restore to browse to the DMG file of macOS that you want to install using USB and open the same.
Finally, click OK button to begin preparing the bootable USB of macOS on your Windows PC.
Step 6: The TransMac tool, in our test, took a little over 90 minutes to prepare the bootable USB.
Once done, Restore Complete message will pop up on the screen. Close TransMac and safely remove the USB.
Step 7: Finally, connect the bootable USB to your Mac, turn on your Mac, hold down the Option key, and then select the USB drive to begin installing macOS. Good luck!
-->Applies To: Windows Server 2016 Essentials, Windows Server 2012 R2 Essentials, Windows Server 2012 Essentials
You can create a bootable USB flash drive to use to deploy Windows Server Essentials. The first step is to prepare the USB flash drive by using DiskPart, which is a command-line utility. For information about DiskPart, see DiskPart Command-Line Options.
Tip
How To Make A Bootable Dmg Usb In Windows
To create a bootable USB flash drive for use in recovering or reinstalling Windows on a PC instead of a server, see Create a recovery drive.
For additional scenarios in which you may want to create or use a bootable USB flash drive, see the following topics:
To create a bootable USB flash drive
Insert a USB flash drive into a running computer.
Open a Command Prompt window as an administrator.
Type
diskpart.In the new command line window that opens, to determine the USB flash drive number or drive letter, at the command prompt, type
list disk, and then click ENTER. Thelist diskcommand displays all the disks on the computer. Note the drive number or drive letter of the USB flash drive.At the command prompt, type
select disk <X>, where X is the drive number or drive letter of the USB flash drive, and then click ENTER.Type
clean, and the click ENTER. This command deletes all data from the USB flash drive.To create a new primary partition on the USB flash drive, type
create partition primary, and then click ENTER.To select the partition that you just created, type
select partition 1, and then click ENTER.To format the partition, type
format fs=ntfs quick, and then click ENTER.Important
If your server platform supports Unified Extensible Firmware Interface (UEFI), you should format the USB flash drive as FAT32 rather than as NTFS. To format the partition as FAT32, type
format fs=fat32 quick, and then click ENTER.Wait until antivirus downloads it's latest virus definition updates and click on ' Start Combo Scan' to start removing Advanced Mac Cleaner.6.
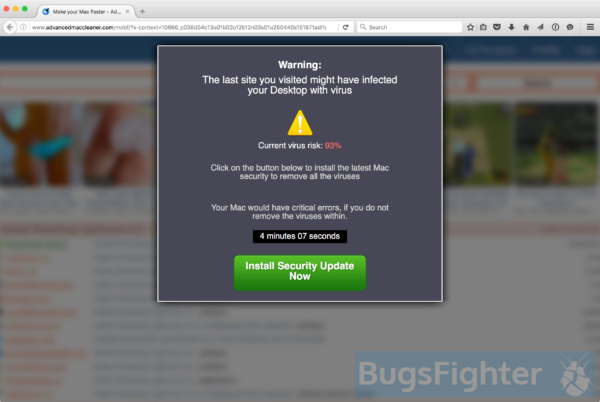 To use antivirus and privacy scanner, users have to upgrade to a premium version.Proceed with the rest of the removal steps if you are comfortable in manually removing malicious objects associated with the threat. Go to Launchpad, Utilities folder, open Activity Monitor.2. Free features of Combo Cleaner include Disk Cleaner, Big Files finder, Duplicate files finder, and Uninstaller. Step 2: Quit Advanced Mac Cleaner ProcessBefore proceeding with the steps below, please close Advanced Mac Cleaner window if in case it is open.1.
Type
active, and then click ENTER.Type
exit, and then click ENTER.When you finish preparing your custom image, save it to the root of the USB flash drive.
See Also
Getting Started with the Windows Server Essentials ADK
Creating and Customizing the Image
Additional Customizations
Preparing the Image for Deployment
Testing the Customer Experience
Getting Started with the Windows Server Essentials ADK
Creating and Customizing the Image
Additional Customizations
Preparing the Image for Deployment
Testing the Customer Experience